Setup Bleed And Margin For Quality Printing - Adobe Illustrator
Setup Bleed And Margin For Quality Printing - Adobe Illustrator
"Adobe Illustrator Bleed and Margin Optimisation for Professional Printing"
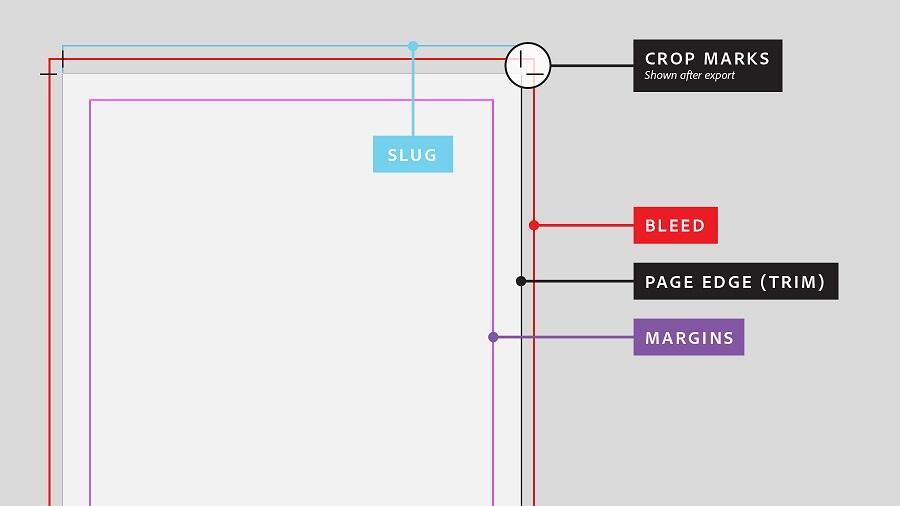
Bleed is the portion of the artwork that extends past the edge of the page. Each piece of paper is unique on a microscopic level after being run through a printing press and a guillotine. We advise that you print photographs over the cutting line to avoid having a white border around the perimeter of your artwork, which can look messy and unprofessional. This ensures a good, clear cut-off point when the paper is sliced.
It's also crucial to keep in mind that straying too far from the edge could have the opposite impact and sever items you want to display. Having your artwork extend beyond the margin of your document is always a smart idea.
Issues Resulting From Incorrect Bleed and Margin Settings:
We'll talk about some actual instances of clients whose artwork files had incorrect bleed and margin settings when they were sent to the factory below. It's usually best to correctly add the bleed and margin on your side, to make sure we prevent any mistakes, even though Printlab has an artwork team that will inspect and adjust your artwork files before submitting them to the factory. In fact, if you don't provide bleed, fixing it might be challenging for the artwork team at Printlab, and a skilled eye might pick up on the corrections.
Here are some issues that can arise from incorrect bleed and margin settings in the context of printing:
1. Content Cut-off: If the bleed area is not properly set, there is a risk of important content, such as images, text, or graphics, being cut off during the printing and trimming process. This can result in incomplete or distorted visuals, negatively impacting the overall design.
2. White Borders: Inadequate margins can lead to undesired white borders around the printed material. This occurs when the artwork does not extend fully to the edge of the paper, leaving empty spaces that were not intended to be there. It can make the final output appear unprofessional or unfinished.
3. Inaccurate Alignment: Without proper margins, elements within the design may not align correctly with the intended layout. This can create visual inconsistencies, misaligned text, or awkward spacing between different design components, compromising the overall visual harmony.
4. Printing Inconsistencies: Insufficient bleed areas may result in inconsistent ink coverage at the edges of the printed piece. This can lead to noticeable variations in color or tone, especially if the artwork extends to the edge of the page. It is essential to provide adequate bleed to ensure consistent and high-quality printing.
5. Difficult Trimming: Insufficient bleed can make the trimming process more challenging for the printer or print service provider. If there is not enough bleed area, it becomes harder to achieve precise cuts, potentially leading to uneven edges or accidental trimming into the artwork.
6. Rejected Print Jobs: Professional printing services often have specific requirements for bleed and margin settings. If the artwork does not meet these specifications, the print job may be rejected, resulting in delays, additional costs, or the need to revise the design and resubmit it.
By understanding and correctly setting up bleed and margin settings, designers can avoid these issues, ensuring their designs are printed accurately and with the desired visual impact.
HOW TO ADD BLEED IN ADOBE ILLUSTRATOR
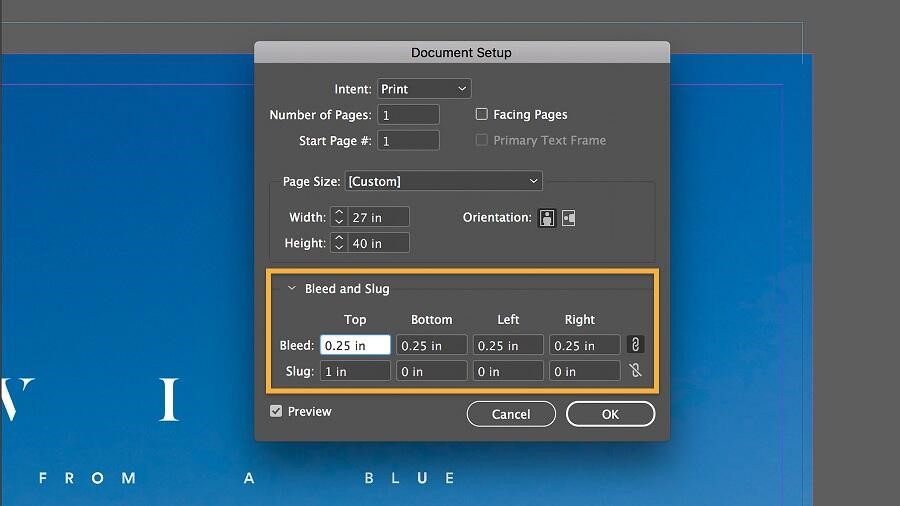
https://helpx.adobe.com/illustrator/using/printers-marks-bleeds.html
- Choose File > Print.
- Select Marks & Bleed on the left side of the Print dialog box.
- Select the kinds of printer’s marks you want to add.