4 Steps to Making a Professional & Print-Ready PDF - Adobe Illustrator
4 Steps to Making a Professional & Print-Ready PDF - Adobe Illustrator
"Easy-to-Follow Guide for Creating High-Quality Print-Ready PDFs in Adobe Illustrator"

Steps to Making a Professional & Print-Ready PDF - Adobe Illustrator
Here is a more detailed description of the steps on how to make a professional and print-ready PDF in Adobe Illustrator:
PART 01 : SETTING UP YOUR DOCUMENT

The first step is to set up your document to the correct size and resolution. The size of your document should be the same size as your finished product, and the resolution should be at least 300 dpi.
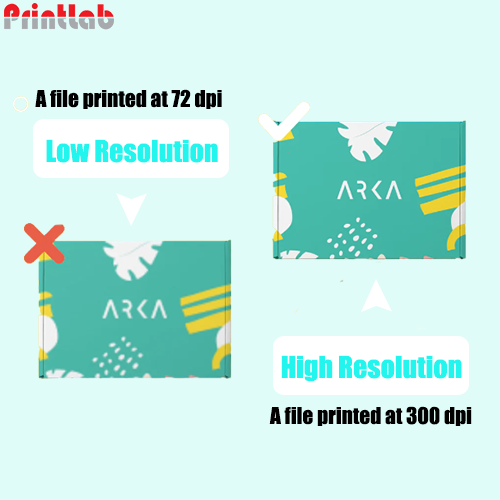
As we previously stated, the DPI has a direct impact on the image quality. You must be aware that lower DPI resolutions are available for this reason. Lower DPI images can be utilised for various things, but they are insufficient for package printing and designs. As follows:
Low Resolution: The lowest quality images have a 72 DPI resolution. They can be utilised for online pictures or other app designs. But that's the only reason they exist. They would be of very poor quality if used for printing. To make things obvious, let's utilise examples. You will receive a print with a total resolution of 720 x 576 pixels if you choose to use this resolution to print a 10x8 inch large photo.
The benefit of 300 DPI is that it produces high-quality prints with sharp detail and smooth gradients. This is because 300 DPI means that there are 300 dots per inch, which is a high enough resolution to capture the fine details of an image.
Here are some of the benefits of using 300 DPI:
- Sharper images: 300 DPI images are sharper than lower DPI images because there are more dots per inch, which means that the image is made up of more pixels. This results in a more detailed and realistic image.
- Smoother gradients: 300 DPI images also have smoother gradients than lower DPI images. This is because the more dots per inch, the more gradual the transition between colors will be. This results in a more natural-looking image.
- Less pixelated images: 300 DPI images are less pixelated than lower DPI images. This is because the more dots per inch, the less noticeable the individual pixels will be. This results in a smoother and more uniform image.
PART 02 : Add crop marks and bleed
Crop marks will help the printer to align your document correctly, and bleed will ensure that your artwork extends to the edge of the document.
- Open your image in Adobe Illustrator.
- Go to File > Print.
- In the Marks and Bleeds section, check the boxes for Crop Marks and Bleed.
- In the Bleed section, enter the amount of bleed you want to add. The default bleed is 0.125 inches.
- Click Print.
PART 03 : EMBED YOUR FONTS
If you are using any custom fonts in your document, you need to embed them so that they will be available to the printer.
- Open your Illustrator file.
- Select the text that you want to embed the fonts in.
- Go to Window > Type > Character.
- In the Character panel, click on the Font tab.
- Under Font Options, select the Embed All Fonts checkbox.
- Click OK.
PART 04 : SAVE YOUR DOCUMENT AS A PDF
- Open your Illustrator file.
- Go to File > Save As.
 x
x
- In the Save As dialog box, select Adobe PDF as the file format.
- You can choose a preset from the Adobe PDF Preset menu, or select a category from the list on the left of the dialog box and then customize the options.
- Click Save.

