From Canva to Print
From Canva to Print
"Preparing Canva Artwork for Professional Printing: A Step-by-Step Guide"
A brief, eye-catching video introducing your business or product is called a Canva design intro. You might use it in marketing materials, on your website, or on social media.
One can: with a well-crafted introduction;
- Getting the audience's attention: The initial few seconds of your video are essential for drawing in the viewer. The first few seconds of your video will pique viewers' interest.
- Brand awareness: By presenting your logo, colours, and font in your intro, you may aid to increase brand recognition. The tone and appearance of your brand might also be introduced to your target market.
- Interest creation: By describing your product or service and why others should care about it, your introduction might encourage interest in it. The audience might also be teased by it.
Step 1: Choosing the right template

- Given the large selection of templates available in Canva, selecting the best one might be challenging. However, there are a few things you should remember to make the procedure simpler.
- Consider the goal of your design first. What are you hoping to accomplish with it? You may begin to reduce your selections after you are aware of the goal. For instance, if you're making a marketing poster, you should pick a visually appealing and attention-getting template.
- Next, target your audience. Whom are you attempting to communicate with through your design? When you are aware of your audience, you may select a template that is pertinent to their requirements and areas of interest.
Additional pointers for selecting the ideal template in Canva are provided below:
- Utilise the search bar: The search bar on Canva is a terrific tool for locating templates that are pertinent to your requirements. Simply enter a word or phrase, and Canva will present you with a range of related designs.
- Find templates by category: Canva classifies its template categories into marketing, social media, and presentation-related subcategories. This might help you reduce your list of choices.
- Check out the templates: Make sure a template is what you need before deciding to use it by previewing it first. Templates may be previewed by clicking on them, followed by the "Preview" button.
- Adapt the template: Once you've selected a template, you may modify it.
Step 2: Designing your artwork

Canva is a fantastic tool for creating art. It contains a range of tools and templates to assist you in creating beautiful designs, and it is simple to use, even for novices.
Here are some pointers for using Canva to create your artwork:
- Start by making a plan. Spend some time considering the aesthetic you want for your artwork before you begin developing. What is the main point you wish to make? What fonts, colours, and pictures are you going to use?
- Employ templates. You may choose one of the many templates available on Canva to get started. These templates may help you build designs that are aesthetically pleasing while also saving you a lot of time and work.
- Include your own style. Don't be hesitant to add your own flair after you have a template. Modify the photos, fonts, and colours to reflect your personal taste. You may also include own content and images.
- Employ the grid. The grid is a fantastic tool for maintaining alignment and organisation in your designs. You may use it to make designs that are both aesthetically pleasing and simple to understand.
- Check out your design. Make careful to preview your design on several devices before committing it to paper. You may use this to make sure your design appears excellent across all screen sizes.
Here are some more pointers for using Canva to create artwork:
- Use photos of a high calibre. Your design's overall aesthetic will be significantly influenced by the photos you utilise. Use only photographs of the highest calibre that support your message.
- Text should be concise and clear. Your design's text should be short and easy to read. It need to be simple to read and comprehend.
- Maintain a constant look. Your design need to have a unified aesthetic. Use the same fonts, colours, and graphics throughout your design to achieve this.
- Get opinions. Once your design is complete, make sure to solicit input from others. This will enable you to pinpoint any areas that require development.
I hope these pointers will help you use Canva to create your artwork.
Step 3: Add Margin and Bleed
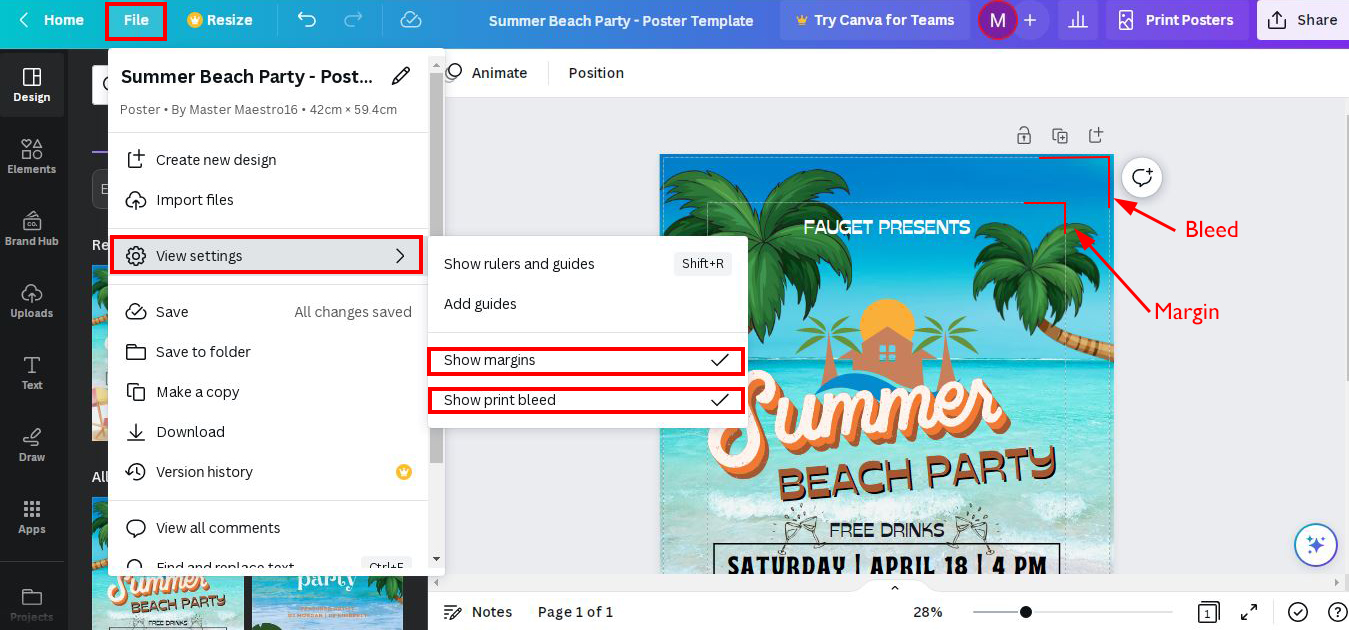
Yes, these are the steps for adding bleed and margin in Canva:
- Launch Canva and open your design.
- In the editor's upper right corner
- Select the More icon (three dots).the View settings option.
- Enter the desired margin size in pixels under Margins.
- Enter the desired bleed size in pixels under Bleed.
- Select Apply.
The margin is the area between your design's edge and the page's edge. It's crucial to include margin in your design so that there is some room between it and the page's edge. By doing this, you may lessen the likelihood that your design will be chopped off during printing.
The amount of additional room that is added to your design's edges. In order to prevent your design from being chopped off while cutting, this extra area has been printed.
Additional pointers for creating margin and bleed in Canva are provided below:
- Canva's standard margin size is 20 pixels. Nevertheless, depending on the size of your design and the printer you're using, you might need to change this size.
- In Canva, the bleed size by default is 3mm. Nevertheless, depending on the printer you're using, you might need to modify this size.
- In Canva, the margin and bleed settings could have be chosen if you are using a template. To see whether any margin or bleed has been included, check the template settings.
I hope this helpful.
Step 4: Exporting your design
It's time to export your artwork for printing once you've completed designing it. Canva offers a variety of file formats, including PDF, PNG, and JPEG, for exporting your design.
Here are the steps to follow in order to obtain the correct file format for Printlab printing of your artwork.
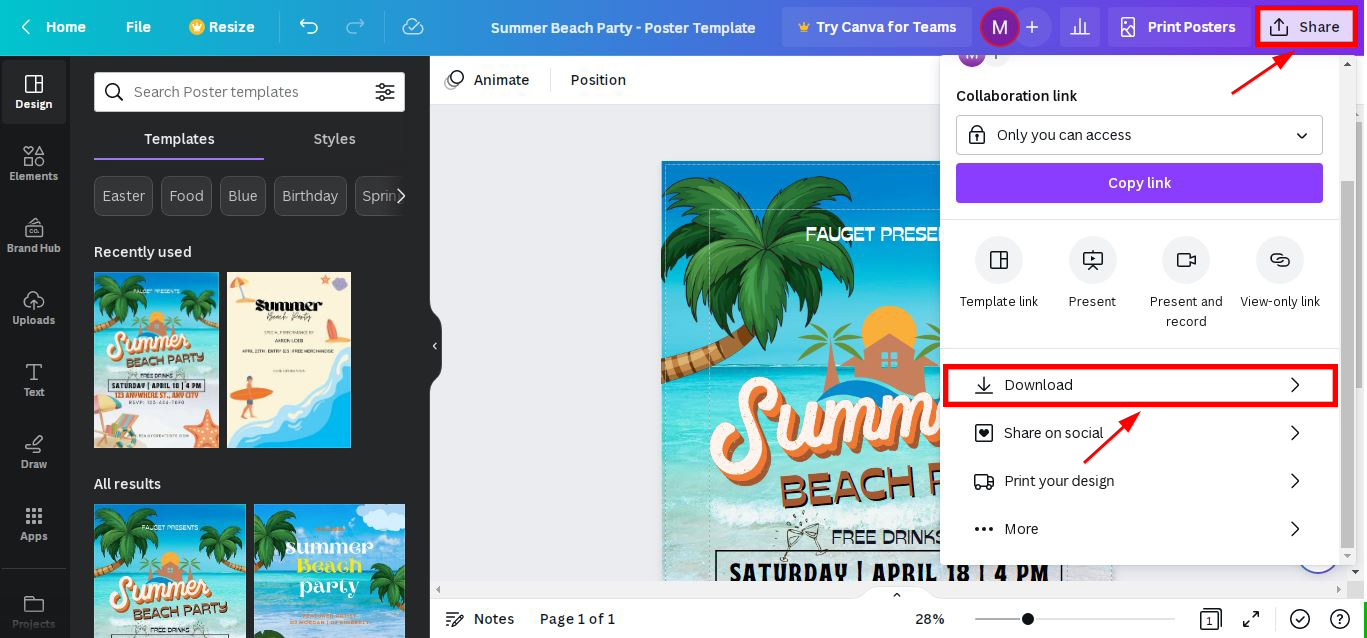
To download the file, click on Share > Download
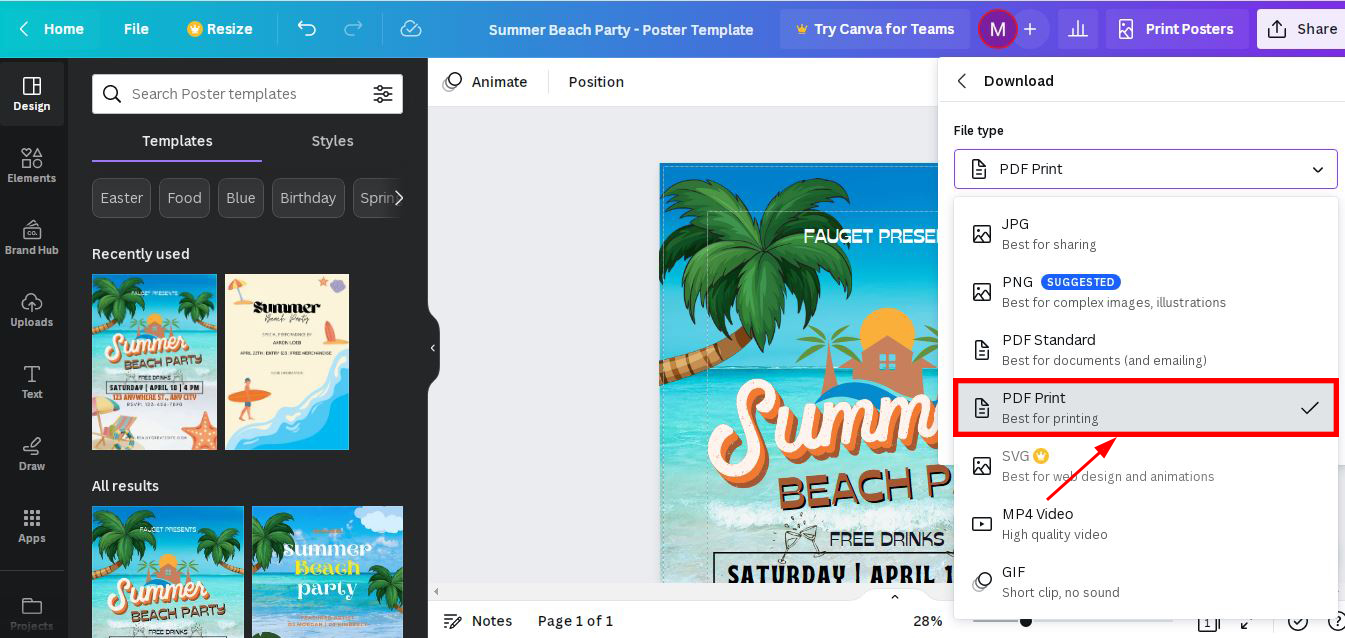
Choose the right file format > PDF Print
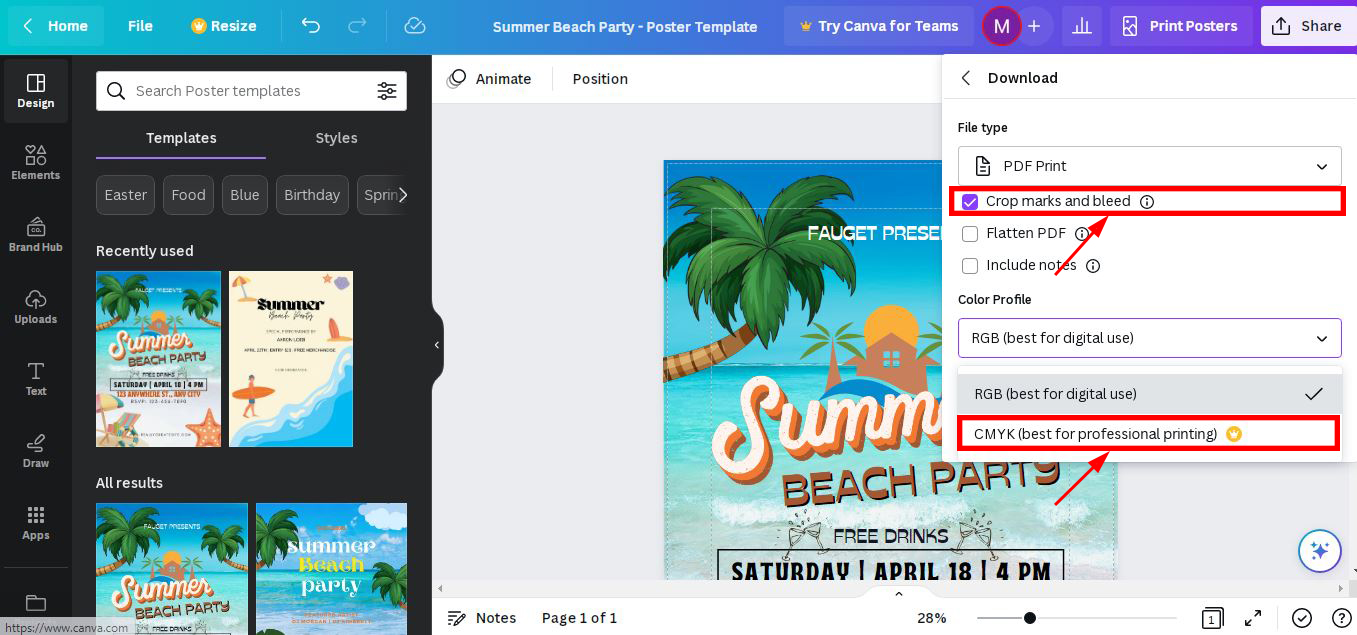
Under the PDF Print file type, select > Crop marks and bleed > select the page(s) that you want to print and > choose CMYK colour profile > select Download > Done!
Here are the many file types that you may export from Canva with your design:
- PNG is a lossless compression format that keeps your design's quality.
- JPEG uses lossy compression to make your design's file size smaller.
- On most devices, PDF can be opened and viewed since it is a flexible format.
- SVG is a vector format that allows for unlimited scaling without sacrificing quality.
Here are some more pointers for exporting your Canva design:
- Be careful to use a high-resolution file type, such as PNG or PDF, if you are exporting your design for printing.
- You may use a lower-resolution file type, such JPEG, when exporting your design for the web.
- You have the option of choosing a square or rectangle file format for your social media design.
I hope this is useful.
Step 6: Checking your artwork
Additional advice for double-checking your Canva artwork is provided below:
- Check out your design on various platforms. You may use this to make sure your design appears excellent across all screen sizes.
- Obtain input from other people. See whether your friends, family, or coworkers have any recommendations for improvement by getting their input.
- Get your design printed. You can identify any possible issues with the layout or general appearance of your design by printing a copy of it.
I hope these tips help you check your Canva artwork.
Step 7: Uploading your artwork
Additional details is like quantity and size required.